Time Savers and Helpful Tips

So I had such GREAT intentions last week!  I was going to link up with Blog Hoppin's linky party and have some great ideas to share with you.  However, as you know, life tends to get in the way, and 3 nights last week, I fell asleep with my laptop on my lap and didn't finish a single blog post!  (I blame my computer- it was being slow!)

I decided that I was going to go ahead and post my ideas anyway!  I know I always like to read other teacher's ideas, especially about classroom organization, so I am sharing some of mine with you today.  Five, to be exact.

Tip #1:  Keep everything handy!
My favorite time saver tip is to keep everything handy.  I keep all of my supplies in labeled bins in the classroom.  I also have a ton of small dollar store baskets, yogurt/dog food containers, etc... hanging out around the classroom.  Whenever I am preparing for a new activity, I stick the supplies the students will need in those containers, so I can grab them and pass them out to partners, groups, etc...  It cuts down the time that I spend passing out materials, which cuts down on transition time and gives students more time to work!
These students were playing a math game.  The cards and the color tiles were placed in a basket, and then I just handed the basket to each student.  Super easy!

Tip #2:  Organize your learning targets.
Something else that has saved me a ton of time is creating these  "I Can" statements for each of the standards.  I keep them organized in a file folder box, with each strand in its own folder.  If I need a standard that is a Language standard, I look in that folder.  If I need a place value standard, I look in the NBT folder.  Etc... And then I hang them up.  Since they are already written out, when I go to put the standard in my plans, they are ready for me to just copy and paste into my plans!  Even if you don't have cute posters like mine, having a page with your targets typed up and kept on your computer or in your plan book would be very helpful!  


Tip #3:  Curb the paper monster.
As for organizing materials, I can tell you all honestly that I HATE paper.  The stuff ends up everywhere, and I can never seem to keep up with it all.  If it has a home, such as a binder or folder, great, but otherwise, I am tempted to throw all of it away!  But I like to have stuff prepared ahead of time if possible.  So last year I went to Hobby Lobby and bought these 12x12 inch scrapbooking drawers.  I actually made 2 trips so I could use 2 coupons!  I stacked them on top of each other, and made a label for each subject.  Then I can place copies that I have made in the drawer for the appropriate subject.  


In the past, I have tried color coordinated folders (yes, each of my subjects is color coordinated!), but those didn't work as well for me.  These drawers do!  I love that I know where my copies are when I need them, and that my copies are prepared ahead of time!  Such a lifesaver for me! 

Tip #4:  Find creative ways to store all those extra supplies!
I have a ton of school supplies that I purchase myself during the back to school sales, but I don't have a ton of storage space in my classroom.  I am so jealous of you teachers who have cabinets and closets!  I have 2 cabinets, but frankly, they don't hold as much as I would like them to.  So I made some milk crate seats for my classroom 2 years ago, and this past year, I made 5 gallon bucket seats for my reading table.  (I don't have a picture of my crate seats.  Can you believe it?!)  I love them, because they give the students a place to sit, and also allow me to store supplies such as glue sticks, composition notebooks, markers, and plastic baggies.  I don't know what I ever did without them! 

Tip #5:  Use rings to organize materials.
My other favorite thing is RINGS.  I have a special drawer just for rings in my little organizer.  I am always putting something on a ring!  I put flash cards and task cards on a ring to use at my Guided Reading table.  I made smaller copies of my "I Can" statements and use a ring to hang them on my Writing/Word Work containers.  I have the parents fill out a student information card on cardstock, then I stick those on a ring! I hang it by the phone.  Whenever we go on field trips, I grab the entire thing and put it in my backpack, in case of an emergency!  I am a little ring crazy, I guess, but I like things to be organized! 

I certainly hope this post helped out somebody!  I have a few more ideas, so look for a Time Savers and Helpful Hints (part 2) post coming up someday.  Maybe I should get more organized about my blogging... :-) 

Tutorial, Giveaway, and 2 Announcements!

I had heard that it was possible, but I didn't believe it.  I finally tried it one day, and my entire life was changed.  What is it, you ask?

Printing multiple pages of a PDF on one page.

And doing it is SO SIMPLE, I have to ask myself why I haven't been doing it for years!  Lately, I've been printing everything mini!  It's so much fun!

If you saw my posts on Guided Reading and Centers, you may have seen these pictures, where I mentioned how I like to attach the "I Can" Statement to the container or how I post them for each group so that nobody can say I'm not teaching the standards!  I simply printed multiple pages of a PDF on one page to make smaller versions of the posters to serve this purpose.


If you want to know how to print smaller versions of PDF files, I've prepared a simple tutorial.  And by simple, I mean, there are like 4 pictures total.  Ok, there are 11 in the basic tutorial and a few more if you want a few more advanced options, but I did it step. by. step.  I could have done it in 4.  Yeah, it's that easy.


I took it one step further and made smaller versions of my Reading Buddies posters to put in my group pocket chart too.  The large strategy we are working on can hang up in the room, but sometimes the groups are working on different strategies, so it's nice to have smaller versions of the posters for students to reference when they are at my table.  Plus, they can connect the Beanie Baby to the poster when I present them together.


So here is the tutorial.  I apologize because it's not the prettiest tutorial in the world, but my computer was being super sloooooowww and I was getting annoyed, so I just got it finished in the quickest manner possible.

(If you aren't printing the entire document, take note of the specific pages you want to print so you can enter them in the print dialogue.)

You can choose a range of pages, or specific page numbers, or print all the pages.  

This is where it gets tricky! :-)  NOT!


You will see a drop down menu pop up.  Click on it.

It gives you options, or you can choose a custom number on each page.


This is 2 pages per sheet.  This is the one I use the most.  It makes each page a half a sheet.

And that's it!

You can also customize how to print it so the pages fit better on the page. 

They were printing horizontally and in portrait mode, but look at all that white space!  What a waste!

I was able to make it fit much better!

Look at how great that looks!  And I can cut each of the "I Can" Statements out more easily because of the border.  Viola!


All about Centers!


An important component of Guided Reading is the independent practice that your students should be doing while you are teaching!  It is so important to create a classroom climate where the students can work independently, get help from friends of they need it, and stay busy without interrupting the important learning going on at the guided reading table!  I like to use centers to give my students independent practice with skills we have been working on, while giving myself the chance to focus on teaching my students how to read.

If you missed it, I wrote about how I organize guided reading in my classroom here.

I feel like my center rotation is looks like the biggest mess ever to the untrained eye! :-)  However, my students and I are pros now!  We do 4 rotations a day.  The first rotation is only 10 minutes due to time constraints.  4 of my groups do "Read to Self" or "Read to Someone" (when I'm feeling generous!), and I meet with my highest group that are reading at a DRA level 18.  I only meet with them briefly and read with them or check their work from the day before, and then they go off and work by themselves during their "Reading Response" rotation.  The rest of the rotations are 20 minutes each.

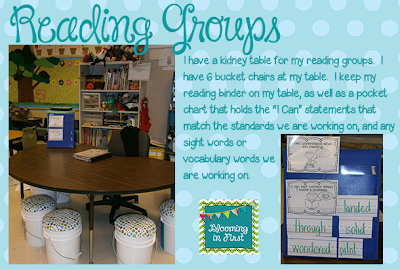
I group my students heterogeneously, so they don't go to the same reading group with students from their center group.  As a result, at the most, there are only 3 students in a center at a time, which helps keep things calm!  I have small flower clips that I put next to the center the groups are going to for that day (not pictured).  The red chart is the rotation for each "round", and the blue and green chart are the center rotation.  The numbers are the group numbers.  It works for me, but I miss the simple chart I used a few years ago!

I love the idea of using choice with the students, a la Daily 5, but that's not something I feel this group can handle.  I used it 2 years ago and loved it, but there are too many rotations and too much going on that I don't feel like I can use it this year.  Maybe later in the year. :-/

I mentioned in my post about guided reading that I think that organization is so important when it comes to guided reading, and I think the same is true about centers!  It is important to have everything your students need easily accessible to them so they aren't interrupting you asking you where to get a glue stick or how to do an activity.  I have a bin for my word work and writing centers, and I keep all the materials in the bins.  Writing is read, and word work is green.  They take the red bin to the red table, and green bin to the green table, so there is no confusion there.  I purchased these bins at Target in the Dollar Spot a few years ago, I believe, but Michaels has something similar.  Or at least they did.


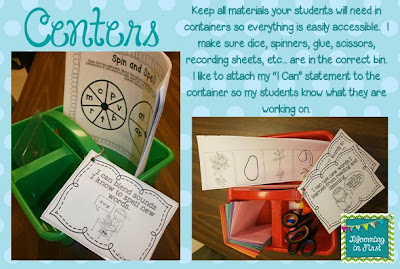
Right now, I only have 1 activity in the bin that all the students will do.  However, as the year goes on, I will differentiate the activities and have different versions of an activity, or 2 different activities, depending on the needs of my students.  When this happens, I usually use folders to keep the materials in, and I just put the folders in the bin instead.

I also keep a copy of the "I Can" statement on the center as well.  This way, if somebody were to walk into my room, they would be able to see what skill the students are working on.  The skill doesn't always match the one I have posted on my "I Can" board because these skills are review or independent practice of skills the students have mastered/almost mastered.  So this allows them to see that they are working on a particular standard without having to stop and ask me!  I started doing this last year.  I just typed them up and laminated them and posted them to the center bin with a ring, but this year, I printed out my adorable Visual "I Can" Statements 4 to a page, laminated them, and hang them on a ring.  (Does anybody need instructions on how to do this?  It's super easy!)  When I'm not using them, the rest of them are hanging on a ring near my guided reading table, so it is easy to find a the right standard and switch them out.  So far, so good!

I have 5 centers in my room:  Read to Someone, computer, Listen to Reading, Word Work, and Writing.  I also do Read to Self with all of the class at the same time while I'm working with my high group, and Reading Response.  I have one group that does not go to centers at all.  Instead, they meet with the ECE teacher and myself, and then they get on the computer to do a program called Successmaker during the last rotation for an intervention.

Reading Response and Writing are 2 different centers.  Reading Response is where the students respond to the text they read during their guided reading group.  They may do something with vocabulary, answer a question, practice sequencing the story, or something else with their guided reading book.  Writing is where they respond to the book we read as a class during Shared Reading.  For example, the week after we read Pumpkin Pumpkin and Growing Pumpkins during Shared Reading, the students had to sequence the life cycle of a pumpkin in a little flip book and write the steps.  They had to use vocabulary from the book we read, such as the word "sprout".  The papers, flip books, scissors, and glue are all there.  Pencils and crayons are already on the table.

My word work activity is always a review of a skill we've been working on or something they should be able to do independently.  I like to have lots of varied activities for the students to participate in.  Sometimes it's a simple "Spin and Spell" activity where they blend words and determine if they are real words or nonsense words.  I've done sentence scrambles, sorts, and a few other different types of activities.  I like sorts the best, I must say!  They are easy to do, and the students can do them pretty independently.

This past week, I used a syllable sort from my fall unit.  I loved watching my students work together on the activity!  Look at these cuties working hard!  I actually got up to take their picture because they were working hard!  They weren't posing for me at all!  And look at those readers in the background!  SO PROUD!  (Please ignore the overturned chair though- one of my friends had a "moment" and had to leave the classroom for awhile.  So the chair was waiting for him to come back and fix it.  We've got to learn to fix our mistakes, you know!)


A favorite center in the classroom is Listen to Reading.  I don't have a typical listening center in my room.  When I taught Kindergarten, I had the typical tape player with 3-4 pairs of headphones and the tapes.  When I moved to 1st grade 3 years ago, I wasn't allowed to take the listening center with me.  For the first year I was in first, I used the computers we had in the room (2 at the time) for the listening center.

Then last year, I wrote up a Donors Choose project and received 4 iPods for my room.  They are AWESOME.  The 4 iPods are iPod shuffles, and I chose to get 4 different colors for easy identification!  They are super small, so I have the students keep them in a bag I got from the scrapbooking section of Michaels.  It's the small black bag to the left.  Each of the compartments is color coded to match the color of the iPod, so the students know where to put the iPods when they are finished.  I can easily check to see if the iPods were put back where they belong as well.  The books for each iPod are in canvas bags that are also color coded to match the iPod.  There are 4 bags with a different color rick rack.  The student can grab the bag, which also has the headphones in it, and an iPod, and find a spot in the room to sit.  You can see one of my students following along with Corduroy on the iPod!  The best part is that I can purchase CDs from Scholastic, rip them to my computer, and sync them to the iPods.  I only have to buy 1 CD, but I can purchase several copies of a book, or I can put different stories on different iPods.  I can easily change the books with the seasons, books we've read as a class, etc...   I could do an entire blog post on my Listen to Reading center, so I'll shut up now. :-)

We also received 6 Chromebooks from Donors Choose last year, so I use these computers for my Computer center.  I built the little bench they are sitting on.  The other computers (which are on the other side of the room) are used for Successmaker.  These don't run Successmaker (the Chrome OS doesn't run Java) so the students get on Starfall.  I'm looking for new sites for the students to get on.  I have used Scootpad in the past, but I would like something a little more kid friendly.  Any suggestions?


The students also need a place to store their own materials!  Completed or uncompleted work, their center notebook, their book choices... enter book boxes!  I purchase these each year from IKEA because they are so cheap!  I give each student their book box, and it is a big deal to be able to decorate them with markers.  I usually put their pictures on them as well.  Then I reinforce them with packing tape or contact paper on the bottoms, and teach the students to use them appropriately!  I took this picture awhile ago, so there were no books in them yet!  The students can choose a few books from the classroom library to keep in their book boxes.  We switch them out every few weeks.  At the end of the year, I let the students keep their book boxes and take them home.

I hope you found this post informative!  I am glad I was able to share a bit about how I run centers in my classroom.  If you have any questions or want to learn more, let me know, and I'll be happy to share!

Five for Friday and Currently!

It's Currently time, and you know what that means... it's NOVEMBER.  Holy cow!  How is it November already?  I turned on my radio to the Gen-X radio station last night when I was coming home from work, and they were playing Christmas music!  I wondered if I may have slept through November, because November 1 is way too early to play Christmas music!


Listening:  There was nothing good on TV this morning.  So I turned on the DVR just to have something to listen to.  

Loving:  I am a part of 2 exciting events this weekend!  They both start on Friday!  Stay tuned to both my Facebook page and my blog for information later this week!  And yes, they involve FREE STUFF. :-)  I can't wait!

Thinking:  I have a birthday party to go to in a few hours, and I still don't even have a gift.  I have part of a gift, but I need something else to go with it, which means I need to get up and go buy something before I go!  I also have some work to do on the exciting events this weekend, so I should probably get crackin' on that too!

Wanting:  I woke up several times Sunday night/Monday morning with this horrible tooth pain.  I spent 90% of Tuesday with an ice pack on my mouth because it hurt SO BADLY even after I took Tylenol/Advil.  I wanted to cry.  So I took off Wednesday to go to the dentist, and he said he thinks I have a tooth that is cracked on the inside, and it's abscessed.  UGH.  It's the same tooth I've had 2 fillings in.  :-(  So he gave me a prescription for Penicillin and told me to come back Tuesday to find out if they are going to pull my tooth or if I get a root canal.  Sounds EXPENSIVE.  I am so not interested.  And I am so worried about paying for it.  I have a hard enough time paying my bills as it is.  I have a mini heart attack everytime I get an email from my bank.  So... this is not good.  Which leads me into...

Needing:  So I need some sort of intervention... a donation from a sugar daddy... something to pay for what I know is going to be an expensive dental bill.  The first question out of my mouth was "Do you have a payment plan?"  I should have asked them if they work on compliments.  

A Yummy Pin:  I want to make these cheesecake pops!  I love cheesecake!  And who doesn't love food on a stick?  I could eat a few of these, I'm sure.  I mean, after I can eat food like a normal human again.


1.  My week has pretty much been defined by the toothache I mentioned earlier.  It hurts!  I decided one night this week that I wanted a milkshake and soup, because my tooth hurt.  So I went to McDonalds, bought a chocolate milkshake, and came home with it and my soup... and promptly dropped the milkshake on my back porch.

:-(

I can't wait to eat like a normal human again.  All I've eaten this week is soup and baked potatoes.  I want FOOD.  Like nachos.

And I don't want to sit in that retro-fabulous dentists chair again for a loooonnnngggg time.

2.  In the past few weeks, I've received the scores from my Praxis exam and my copy of my Masters Degree!  YAY!!!  I seriously need a celebration.  I worked HARD for it!  Now I need to get all my paperwork in to 2 different states so that I can get my raise.  I can't wait!  (See above about needing money to pay for expensive dental bill!)

3.  We had a fun Halloween party on Thursday.  I set up a spread of our yummy snacks.  Please ignore the mess behind it.  We were working on making bats, which we didn't finish!  Oops.  The paint took longer to dry than I thought.  So we'll have to finish them next week.  We're reading Stellaluna, so it's still relevant. :-)


I also let my students make Halloween addition problems with those foam Halloween stickers from the dollar store.  They loved it!  They loved using the white crayons on the black paper to make spooky Halloween pictures.  I love the clouds and the haunted house with the gravestones.  Hysterical. :-)

4.  Friday was our 50th day of school.  I wore a poodle skirt and sweater and popped the lenses out of some polka dot glasses.  The picture below is actually from last year, because I didn't get a picture of myself.  But I wore the same skirt and a white sweater that I buttoned up.  I had a scarf around my neck.  The sock money is my giant almost 4 foot sock money that had his jeans and sleeves rolled up. :-)  The kids got a kick out of him!

I decorated the classroom a bit for the day.  I printed off the juke box from Scrappin Doodles clip art, enlarged it on our postermaker, and hung it up in the room.  I also printed off some of the records and hung them from the ceiling and put them on the Smartboard.  Nothing too fancy, but the kids loved it.

Unfortunately, I forgot my camera at home, so I didn't get any pictures of the actual day.  But we had fun.  We talked about how the fifties were different than today, and how schools were different back then than they are today.  One of the teachers from our school came to tell the students about how things were like when she was growing up, like the games she used to play, what school was like, etc... It also helped the students to see that everybody who lived back in the 1950's weren't all dead. :-)

We also did a book about the number 50, made a necklace with 50 beads, and made rootbeer floats.  It was a fun afternoon!

This conversation happened yesterday as well:
Me: They only had small, black and white TVs in the 1950's. They didn't have DVD players and DVRs. Oh, and there were no video games. No X-boxes or Wiis or PSPs. Kids played with toys.

Every single first grader in my class: MIND. BLOWN.

5.  I don't really have anything else to say about this week.  So I'll just let you all know that I posted some fall centers to my store this week.  It's a set of math and literacy centers.  These are great to hold you over for the next few weeks until Thanksgiving!  I know I'm not QUITE ready for Pilgrims and turkeys yet!

The math centers are about number sense and place value- number ordering, adding and subtracting 1 and 10, tally marks, and tally marks and graphing. There are literacy centers for sight words (2), syllables, blends, blending words, and punctuation.  Each activity is available in color and black and white, just in case you can't print in color ink either!

There is also a student book that you can use while you are exploring pumpkins.  It has some math and some science activities in it, such as whether a pumpkin sinks for floats, a pumpkin life cycle activity, measuring the height and circumference of a pumpkin, using your 5 senses to explore a pumpkin, and some pumpkin seed word problems.  Some of the activities can be completed independently, while some will need teacher support.

I will write a post sometime this week about the fun my class had exploring their pumpkins.  My students loved doing the book.  They were so excited to work with their pumpkins after we went to the pumpkin patch!  I, on the other hand, was so excited to send them home! :-)

I used the syllable sort last week as my word work center.  The students did a great job placing their hands under their chins to hear how many syllables are in a word and sorting them.  I love my smart kiddos. :-)

Next week, we are celebrating Election Day.  I just wrote a Throwback Thursday post about how we celebrated Election Day last year if you want to check it out!  I can't wait to talk about Election Day again this year! :-)

Also, I am a part of a great birthday giveaway that I wanted to share with all of you!


Go to Tara's Facebook page and go to the Birthday Giveaway tab to enter to win!

Have a great week, and a great November! :-)